Cost & Practical Guides
Aluminium Sliding Window Maintenance: Track Cleaning, Weep Hole Drainage & Roller Replacement
By Sheng Xu · 25 September 2026
AI-generated illustrative image. Not a product test, certification record or project evidence.
Routine maintenance for aluminium sliding windows prevents track grinding, water leaks, and roller failure through three actionable homeowner procedures: vacuuming and silicone-lubricating bottom tracks, clearing clogged exterior sill weep holes with a nylon probe, and adjusting or replacing worn carriage rollers ($15–$35 DIY). However, structural issues—including failed double-glazed IGU seals (internal condensation fogging), warped sub-sills, cracked laminated safety glass, and severe frame racking from foundation settlement—require professional licensed glazing intervention.
Unlike fixed architectural picture windows or side-hinged casements that experience little mechanical friction, aluminium sliding windows are dynamic kinetic assemblies. In an everyday residential slider, heavy glass panels—frequently weighing 30 to 60 kilograms in modern double-glazed units—concentrate their entire physical mass onto two small roller wheels traveling across a narrow bottom aluminium track.
Over time, wind-blown sand, pet hair, dirt, and airborne salt crust accumulate in the sill channels. If left neglected, this grit acts as an abrasive grinding compound that destroys nylon roller tires and eats deep grooves into the aluminium running rail. Fortunately, a structured 20-minute bi-annual maintenance routine can resolve sticking sashes and prevent water ingress. However, knowing your limits as a homeowner is equally vital: certain window failures involve serious structural, water-management, or safety hazards that legally and technically demand a licensed glazier.
Step 1: Deep-Cleaning Sliding Tracks Without Damaging Powder Coating
Before applying any lubricant or attempting to adjust hardware, the running tracks must be meticulously cleaned. Never attempt to clean a gritty track by spraying liquid cleaner directly onto dry dirt; doing so turns dry sand into a sludge that washes deep into roller wheel bearings.
Follow this two-phase cleaning protocol:
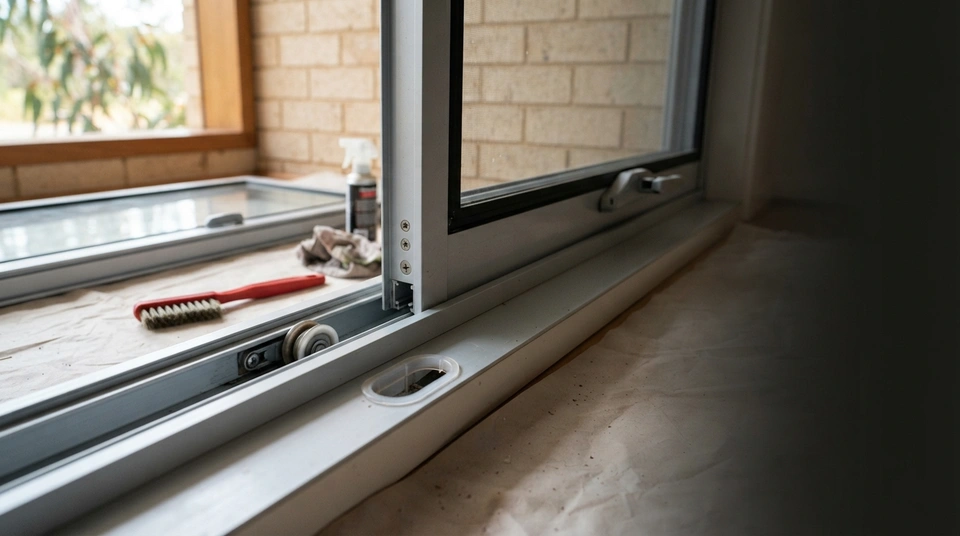
Phase 1 (Dry Extraction): Slide the operable window fully open. Using a vacuum cleaner fitted with a narrow plastic crevice attachment, vacuum the entire length of the sill trough. Pay specific attention to the far corners and the pocket behind the fixed panel where dead insects, dust bunnies, and coarse grit aggregate.
Phase 2 (Detail Wet Scrub): Dip an old soft-bristled toothbrush into a bucket of warm water mixed with a few drops of pH-neutral dishwashing liquid or plain diluted white vinegar (5% acetic acid). Scrub lengthwise along the raised track rail and the drainage channel to dissolve road grime and coastal salt deposits. Use cotton buds to clean tight crevices around the latch strike plate. Wipe the track completely dry with a clean microfiber cloth.
Crucial Chemical Warning: Never use chlorine bleach (sodium hypochlorite) or caustic oven cleaners on aluminium window tracks. Bleach chemically attacks architectural powder coatings (AS 3715), causing micro-pitting, surface chalking, and corrosion within 48 hours. Plain white vinegar safely neutralizes limescale and salt crusts without harming the factory finish.
Step 2: The Lubricant Rules: Dry Silicone vs. The WD-40 Trap
The single most common and costly mistake Australian homeowners make when dealing with a sticking sliding window is grabbing a can of standard petroleum-based penetrating oil (such as classic blue-and-yellow WD-40), CRC, or mechanical grease and spraying it generously down the track.
Petroleum-based lubricants leave an oily, wet film that never dries. In the dusty Australian environment, this wet oil acts as a magnet for airborne dust, sand, and pollen. Within weeks, the oil emulsifies into a thick, sticky black grinding paste. This sludge prevents roller wheels from spinning freely, forcing the seized wheels to skid across the track. This rapidly grinds flat spots into the nylon rollers and gouges permanent ruts into the soft aluminium sill extrusion.
The Approved Solution: Use only Dry Silicone Spray or PTFE (Teflon) Dry Lubricant. Dry silicone dries within seconds into an invisible, non-greasy, ultra-slick micro-barrier that lubricates moving parts while actively repelling dust and dirt.
How to apply: Do not spray silicone recklessly across the glass. Lightly mist the dry silicone spray onto a clean microfiber cloth, then firmly wipe the cloth along the raised running rail. Slide the sash back and forth several times to transfer a micro-film of lubricant onto the internal roller bearings and woolpile seals. The window should immediately glide with light fingertip effort.
Step 3: Inspecting and Unblocking Weep Hole Drainage
Aluminium sliding windows are engineered as managed-water systems under AS 2047. Wind-driven rain running down the exterior glass is designed to penetrate past the outer brush seals into the bottom sill drainage trough, where it is channeled to the exterior through horizontal weep slots.
If these weep holes become clogged with dirt, garden mulch, or spider egg sacs, trapped rainwater has nowhere to go. During severe storms, the sill trough fills like a bathtub until water spills over the internal aluminium track weir, saturating internal timber reveals, rotting wall framing studs, and ruining interior floorboards.
Follow these steps to service weep holes:
1. Locate the external weep slots along the lower outside face of the aluminium window sill. They are typically rectangular slots (around 5mm x 20mm), often fitted with small plastic baffle covers.
2. Gently insert a flexible plastic zip-tie, a nylon pipe cleaner, or a small artist brush through the slot from the outside. Move the probe back and forth to clear accumulated silt and debris. Never use rigid metal wire or coat hangers, which can scratch powder coating or puncture the internal sub-sill flashing membrane.
3. Perform the Water Flush Test: Pour half a cup of clean tap water directly into the internal sill channel. Watch the exterior weep holes. The water should discharge freely onto the exterior brick sill within three to five seconds. If water pools or drains sluggishly, repeat the probe clearing until flow is completely unimpeded.
Step 4: Roller Height Adjustment and DIY Cartridge Replacement
When a sliding window scrapes along the bottom sill, rattles loosely, or fails to lock because the latch does not align with the jamb strike plate, the issue is almost always settled or worn roller assemblies.
Adjusting Roller Height
Look closely at the lower side edges of the operable sliding sash. You will find small circular access holes (often concealed behind small plastic plug caps) at the bottom corners. Inside each hole sits an adjustment screw linked to the internal roller carriage.
Using a standard manual No. 2 Phillips-head screwdriver (never use a high-torque power drill, which will strip the plastic adjustment gears): turn the screw clockwise to raise that corner of the sash, or counter-clockwise to lower it. Adjust both bottom corners until the sash sits level, clears the bottom sill track by 2 to 3 millimetres, and closes completely flush against the vertical jamb weatherstripping.
Replacing Worn Roller Carriages ($15 to $40 DIY)
If turning the adjustment screws produces no lift, or if the window rumbles like a freight train when moved, the roller bearings have seized or the nylon wheels have flat-spotted. Replacing them is a straightforward 30-minute DIY task:
1. Remove the Sliding Sash: Unlock the window and slide it halfway open. Grip the vertical sash stiles with both hands (have a second person assist if the double-glazed unit is heavy). Lift the entire sash straight up into the top head channel. While held up, gently swing the bottom edge of the sash inward over the sill track, then lower the sash down and out of the frame. Rest the glass panel on a soft blanket or cardboard.
2. Extract Old Rollers: Inspect the underside of the bottom sash rail. The roller assemblies are housed in metal or plastic cartridges clipped or screwed into the bottom extrusion. Back out the fixing screws and slide the old roller carriages out.
3. Source Exact Replacements: Australian manufacturers use standardized replacement cartridges from hardware brands such as Cowdroy, Doric, Whitco, or Bradnam's SD1. Take your old roller to a hardware retailer or local glazing supplier to match the wheel diameter, carriage width, and mounting clip profile. Replacement sets typically cost between $15 and $40 per pair.
4. Reinstall and Align: Slide the new roller cartridges into the bottom rail, tighten the fixing screws, and re-hang the sash by reversing the removal process (insert top into head channel first, align over bottom rail, and gently lower). Adjust roller height screws until the window glides with effortless single-finger operation.
When to Call a Professional Licensed Glazier
While routine cleaning, weep hole clearing, and roller replacements are ideal DIY projects, certain window defects involve structural safety, waterproofing integrity, or glass compliance that homeowners should never attempt to fix themselves. Engage a licensed glazier or window specialist in these five scenarios:
1. Internal Condensation or Fogging Between Panes (Blown IGU Seal)
If you observe moisture droplets, misty fogging, or a white calcium haze trapped *between* the two panes of a double-glazed window, the sealed insulated glass unit (IGU) has suffered seal failure. The hermetic primary polyisobutylene seal has ruptured, allowing moisture-laden air to saturate the internal desiccant. This cannot be wiped clean, drilled, or repaired with DIY kits. A licensed glazier must be engaged to measure the exact glass pocket thickness, deglaze the sash, and install a brand-new factory-sealed IGU.
2. Cracked, Chipped, or Broken Glass
Handling broken glass is hazardous. Furthermore, in Australia, all residential glazing must strictly comply with Australian Standard AS 1288 (Glass in buildings—Selection and installation). Windows located near floor level (within 500mm of the floor), in bathrooms, or adjacent to doors are legally mandated Human Impact Safety Zones requiring certified Grade A Toughened or Laminated safety glass. Only a certified glazier can issue the Form 15 / AS 1288 certificate of compliance required by building insurers.
3. Structural Frame Racking and Lintel Settlement
If a sliding window binds because the outer aluminium frame has shifted out of square into a parallelogram—or if the overhead structural lintel has deflected downward and crushed the top track—adjusting roller screws will not solve the problem. Attempting to force the sash open risks shattering the glass under bending stress. A licensed builder or glazier must remove the internal timber architraves, inspect structural framing, and re-pack or re-frame the opening.
4. Water Leaking Behind Wall Linings or Architraves
If rainwater is appearing on internal plasterboard below the window, pooling behind timber skirting boards, or dripping from the ceiling above, the failure is occurring behind the joinery. This indicates compromised structural head flashings, torn wall sarking membranes, or a breached sub-sill pan. Never attempt to stop such leaks by smearing silicone over external weep holes—this traps water inside the wall. Call a specialist to inspect and remediate the flashing envelope.
5. Second-Storey or High-Rise External Access
Never attempt DIY external repairs, sash extractions, or weep hole servicing on elevated upper-storey windows from a domestic ladder. Heavy double-glazed panels act as wind sails; handling a 40kg glass sash while balancing on a ladder carries a severe risk of fatal falls. Work on upper levels requires certified scaffolding, fall-arrest harnesses, and licensed trades compliant with SafeWork Australia regulations.
Frequently Asked Questions
Why should I never use WD-40 or mechanical grease on sliding window tracks?
Petroleum-based oils and greases leave a wet, sticky film that attracts airborne dirt, sand, and pet hair. In Australia dusty environment, this oil-and-dust mixture turns into an abrasive grinding paste that rapidly flat-spots nylon roller wheels and gouges permanent ruts into the soft aluminium sill track. Always use dry silicone spray or PTFE dry lubricant, which dries to a slick, non-stick micro-film.
How do I clear clogged sliding window weep holes?
Locate the rectangular drainage slots on the lower exterior face of the aluminium sill. Insert a flexible plastic zip-tie, nylon pipe cleaner, or soft artist brush through the slots to dislodge dirt and spider webs. Test flow by pouring half a cup of water into the internal sill channel; water should freely discharge out the exterior weep slots within three to five seconds.
How do I know when it is time to replace sliding window rollers?
Rollers need replacement when the window rumbles, screeches, or drags heavily along the track; when the sash cannot be leveled using the corner adjustment screws; or when visible flat spots or seized ball bearings are found upon inspecting the roller wheels. Replacement cartridges cost $15 to $40 per pair and take roughly 15 to 30 minutes to swap.
Can I fix condensation between double-glazed window panes myself?
No. Moisture, fogging, or white haze trapped between the two panes of glass indicates that the hermetic perimeter seal of the insulated glass unit (IGU) has failed. It cannot be drilled, wiped, or repaired with DIY tools. A licensed glazier must be engaged to deglaze the sash and install a new factory-sealed IGU.
Seasonal Maintenance Schedule for Australian Homes
To keep your sliding windows operating effortlessly throughout their 30-plus-year lifespan, follow this simple seasonal calendar:
Autumn (Pre-Winter Check): Thoroughly vacuum all sill tracks, wash out coastal salt crust with mild soapy water, wipe dry, and apply a fresh film of dry silicone spray to running rails.
Spring (Pre-Summer & Storm Prep): Probe all exterior sill weep holes with a nylon zip-tie, run the half-cup water flush test to guarantee free drainage, and check that insect screens clip tightly into their channels.
Every 5 to 7 Years: Check roller carriages for smooth rotation. If a sash begins to drag or drop out of square, adjust the corner screws or invest $30 in a new pair of factory-spec replacement rollers to restore effortless single-finger glide action.